by Terry Maynard | Dec 28, 2020 | Refurbish
I’ve never driven the GT so I have no idea if sound deeding is even needed. My goal for the GT is to be my daily driver up to retirement and beyond. Therefore, I plan to use it for quite a few years so its imperative to have a comfortable car to service my requirements.
What to consider:
My main goal is to be able to have normal conversations. In other words, I don’t want to be competing with road and car noises. I do have some hearing loss and I have personally found many modern cars have enough road noise to restrict a regular conversation.

Additionally, there is a consideration for acoustics and audio systems. Ten years ago that very likely would have mattered. Not so now. Modern technology presents alternative options for audio. My young adult children for example want to use Bluetooth to connect their own gadgets wherever they go. Likewise, I’m doing the same more and more.
Some of the portable and rechargeable Bluetooth speakers available put out a pretty decent sound. Also, over the last year, I’ve tended to use personal Bluetooth headsets with great quality audio throughout the day. Importantly, this allows me to connect with a growing amount of audible content on my own device and that gives access to multiple sources. For example, audiobooks, music, streams of content that I learn from throughout most days, news, on-line study lectures, and my phone calls are picked up automatically. Fantastic.
Then there’s the heat generated from the gearbox tunnel and the exhaust system. Importantly, living in a hot climate I want to install an AC system so it’s important to insulate for heat in the GT.
Sound Deadening:
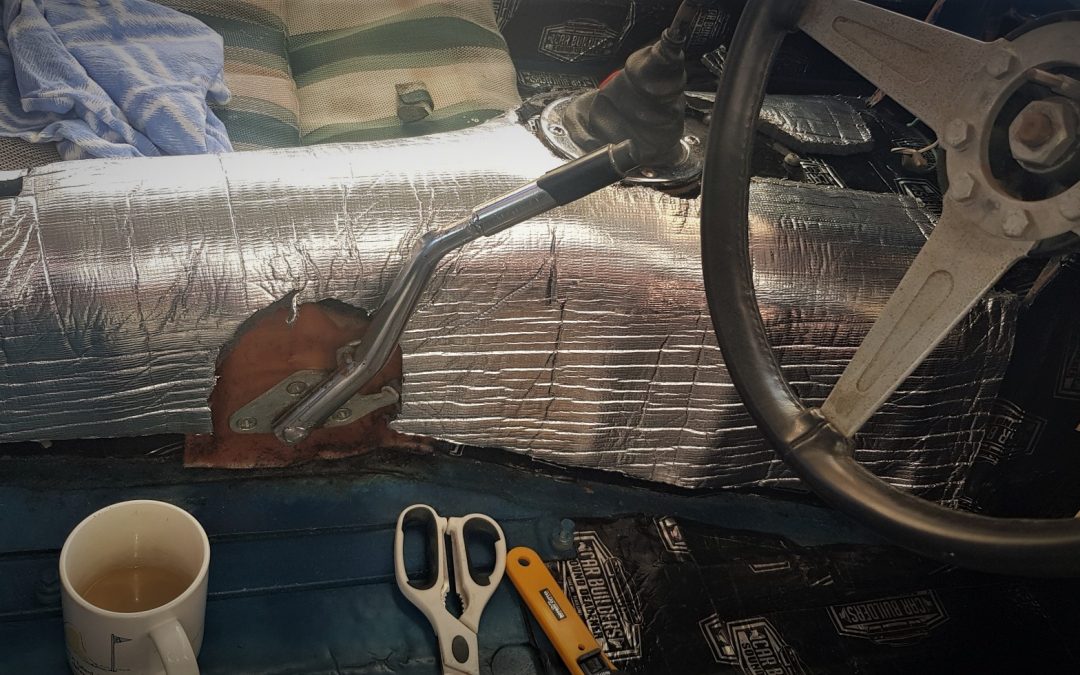
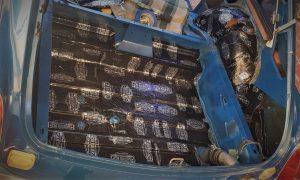
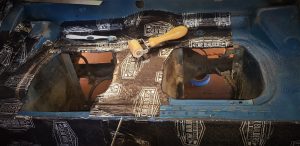
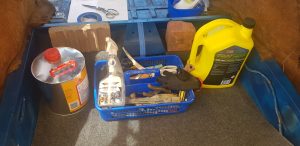
Researching which product will best meet my goals at a cost-effective price presents many options. Regarding sounddedening, there are primarily 2 sound-deadening materials commonly used. Firstly, foam products absorb sound. Secondly, a tar-based Butyl product when stuck to the surface acts to reduce sound-related vibration being transferred through the flat metal body panels. For the GT I primarily used Butyl.
Additionally, I used a 15mm heat rated foam underlay on the floors and front bulkhead.
Heat shield:
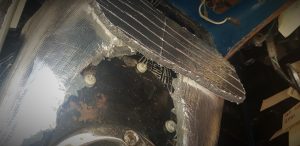
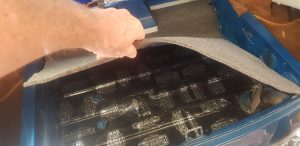
There was already a fibreglass based heat shield over the front portion of the gearbox tunnel. The remainder of the tunnel was covered with the Butyl sound deadener. Finally, overall the tunnel and the front bulkhead, I added a 10mm peel and stick foam-based heat shield from Clark Rubber, Australia.
Application:
Use an alcohol-based product to clean the surface first. Secondly, the right tools make applying the Butyl product much easier. When ordering, also order the roller wheel to work it onto all the surfaces. Additionally, besides the rounded wooden handle on the back of the roller tool, I improvised some tools at home to work corners and around obstructions. For example, a potato peeler with the cutting part taken out is excellent for getting in sharp corners and edges. Thirdly, use the alfoil tape on all the seams and finish off all the edges to prevent moister and cutting your fingers in the future.
Finally, it’s important not to leave air pockets under the Butyl sheets. Moister can get trapped which can lead to rust in the future. Not a good scenario. I cut around some floor cavities so as not to leave air pockets. These spots can be maintained with a regime of regularly dressing with rust prevention. For example, I use lanolin-based rust prevention as part of my regular maintenance, once a year I’ll lift the mats and brush it into these seams, cavities and crevasses.

Summary:
Overall, there is quite a lot of sound deadening and heat shield product throughout the car. Do some research on what is available, how it works, and where to use it. Additionally, understand your goals and budget to decide on the way to progress your project.
Happy MG trails…..
by Terry Maynard | Dec 28, 2020 | Refurbish, Upgrade
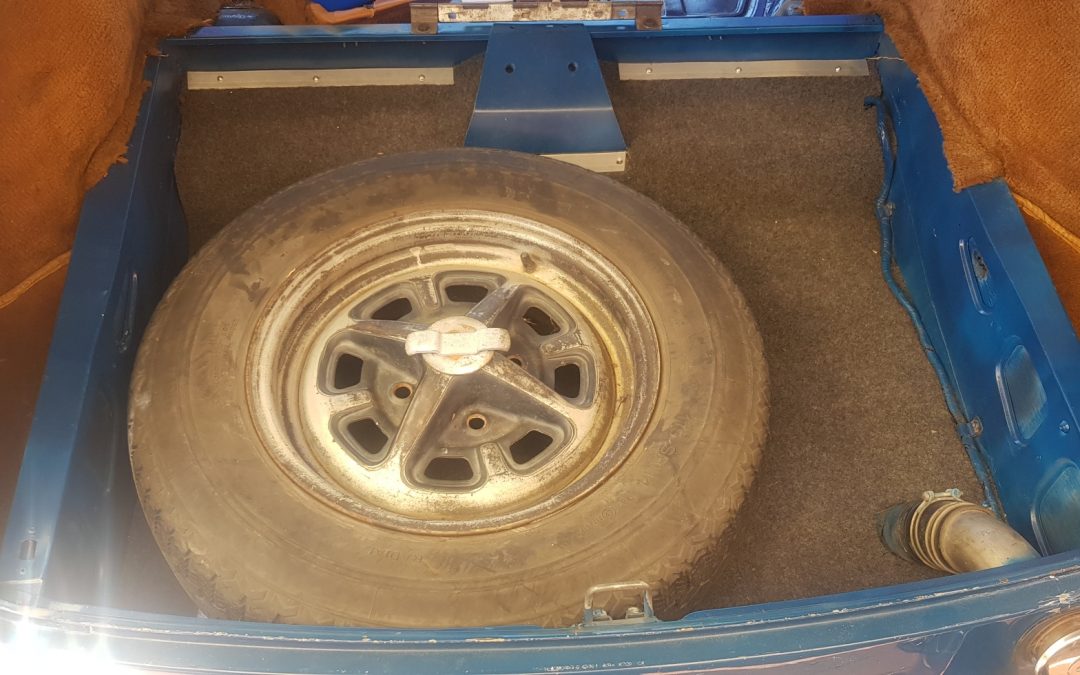
After this job was completed I started to notice that many pics of GT’s online had an untidy boot space. It seems logical to me to tidy it up. Therefore, this is how I tidied up the boot space on the GT project.
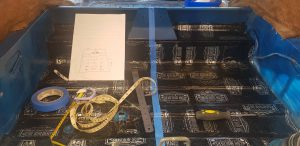
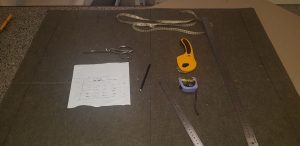
I chose a budget-friendly car carpet in neutral grey tones from a local supplier. Additionally, as the plan is to do quite a few of the interior carpet pieces myself, I thought it prudent to learn some trimming tricks and tips. Quite a few tutorials later I realised I would also need to shop for some decent tools before making a start.
How to:
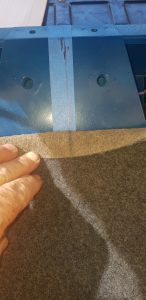
There are some tips to get a clean fitting finish. A centre line in the boot was marked on some low tac tape as a reference point. Additionally, a centre line was marked on the backside of the carpet with a suitable marker. Checked multiple times, the measurements were transferred to the carpet. Being my 1st attempt I cut roughly 5mm over the lines to stay on the safe side. I anticipate my skills improving the more I do this.
The ribs in the boot floor were also measured and marked on the carpet as reference points. I found with more reference points to check it’s easier to get the curved lines marked out on the carpet. I used a compass to mark out circles. Importantly, regularly put the carpet piece in and out of the boot making cuts to check the centre lines and reference points. This keeps you on track.
Moulding Carpet:
To mold carpet in internal corners or contours, spray the area with warm water from a spray bottle. Then, shape and form it with your fist or wooden handle as you place weights to hold the carpet in place. Finally, I left it overnight to help it retain its shape. This process of spaying with hot water, moulding, the use of weights and leaving it overnight works.
Fine-tuning:
With the reference points, I was able to get a neat curved line at the back. Additionally, that 5mm left on my 1st cuts were slowly trimmed, regularly putting it in the boot and checking the centre lines and reference points. Importantly, I used this method to get a clean cut around the fuel filler hose as well.
Happy with my handy work, I contemplated how to finish it off neatly around the shelf towards the front. I simply chose to use some flat aluminium strips screwed down with stainless steel screws. This works well because it secures the carpet in the boot and as a finishing trim it looks good and makes the job look neat. Also, it can easily be lifted up to clean or vacuum, and it can easily be taken out to return the car to the original equipment.
Repairs:
The nut inside the wheel clamp point on the boot floor had worked loose. The repair was going to be necessary for it to work properly. With the surfaces prepared and the wheel retainer screwed into the nut, a piece of 2 pack weld putty from the local hardware was properly kneaded then worked into the hole where the nut locates. Secondly, the clamp was screwed down to force the nut up and hold it in position while the putty set. Thirdly, with the nut properly located, some more weld putty was moulded over and around the clamp fitting. The wheel retainer works properly now and keeps the spare wheel safely clamped down.
Happy MG trails….
by Terry Maynard | Dec 13, 2020 | Refurbish, Repair
Bent Hinges:
When the GT was towed home it got loaded backwards on the flatbed truck. The rear quarter window latches were not connected. At freeway speeds, the windows wanted to blow open which caused the hinges to stretch. Fortunately, the driver noticed and stopped to secure them but not before the hinges got bent out of shape a bit. The windows wouldn’t close into the frame anymore. The solution was to take them out and reshape the hinges This was a delicate job to do without breaking the rivets holding the hinge to the window.
Window Seal:
With the windows out I could see the pinch weld seals were squashed and beyond being serviceable. A quick look online revealed the seals are available but quite expensive, approximately $130 -$150 per side to land in Australia, ouch. A quick trip to Clark Rubber yielded new seals for $25 per side. The difference is the OEM part has welded corners making it all 1 piece. I’ve fitted in 3 pieces, taking time to cut it neatly and overlay the corners with some trimming. The GT project is not going to be a show car, what’s important is keeping the weather out. In addition, the new seals make it quite airtight which is important for my upcoming A/C upgrade. I’m very happy with the job and the price.

Check for Rust:
Another online search revealed it’s common for GT’s in England to have severe rust hidden underneath the chrome trim piece on the bottom sill. Ok, so I better check while I have the opportunity. The rivets securing the trim were drilled out. The GT has spent most of its life in the arid climate of Western Australia, it was grubby underneath but in good condition. It got a quick clean up, a polish, a touch up in the corners with some lanolin-based rust prevention, then the trim piece was riveted back on. The quarter window got screwed back in, followed by the trim piece that covers the B pillar using new stainless steel screws.

Trim Seal Colour:
The old window seal was tan in colour. I wasn’t sure how the black replacement would look. As it turned out from inside against the Autumn Leaf colour vinyl it just looked like black rubber against the trim. To my mind, it just looks like it should, and not out of place at all.
Closing Mechanism:
Many forum comments questioned how the latch on the rear quarter windows works. Some wouldn’t close, some wouldn’t stay open, while others flapped open and closed while driving along. That would be really annoying. With the job finished I was very keen to check how it operated. I’m glad to report that it works perfectly. It simply needs a firm press to close which makes a solid clasp sound as it locks into place. Additionally, it locks into place when opened and stays there. Good news. Another job ticked off the to-do list.
Happy trails all.
by Terry Maynard | Dec 10, 2020 | Refurbish

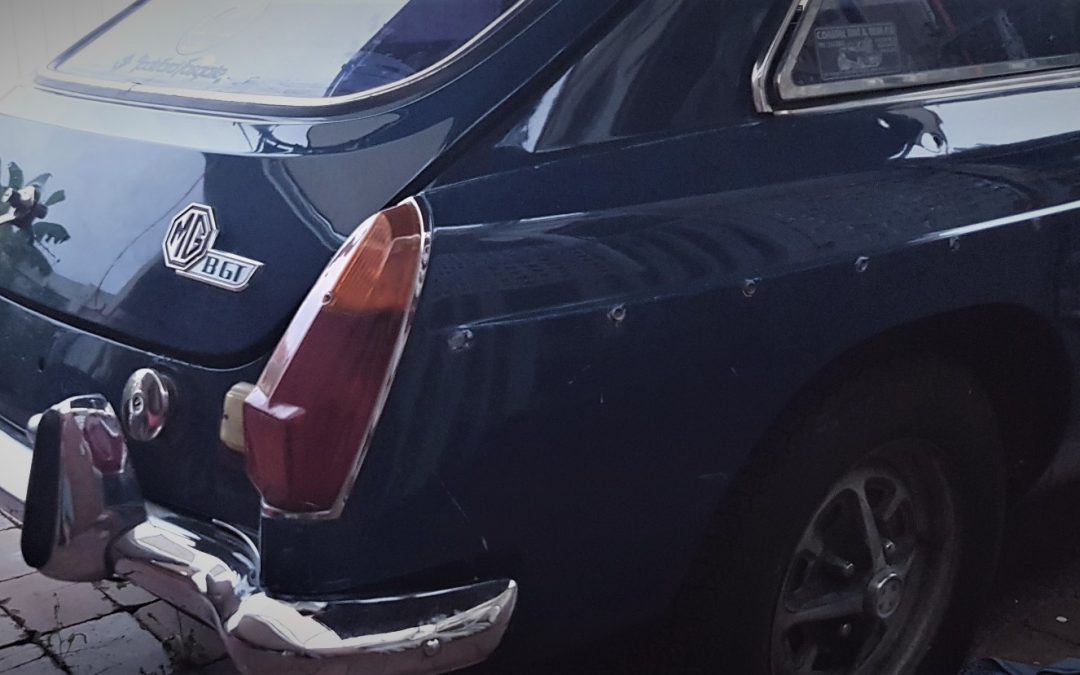
The decision to simply refurbish the car to keep its original patina meant working with the existing paint finish. The paint on the GT as I took custody of it was in a pretty shabby state. It had been stored for an unknown amount of time in an undercroft under a house that was closed at one end by a single garage door, and partially open at the other end which the sea breezes directly accessed to deposit its salt-laden air from the ocean just over a kilometre away. Besides being rough, there were signs of small surface rust beginning to settle in the paint finish.
Oxidation: There are four main culprits to paint oxidation.
1. UV rays produce heat, when that heat penetrates the paint and combines with oxygen it fades the paint.
2. Salt is sodium chloride which is corrosive and eats away at the paint till it reaches the bare metal and forms rust. Those little salt crystals are further activated by UV rays.
3. Pollution in its many forms settle on the paint and if left unattended, guess what, it fades paint. I lived and worked for quite a few years close to a large industrial area and pollution was constantly settling on the car’s paint. The car needed constant washing, and not only that, inside the house required constant dusting. When I moved to another area this was significantly less for both car and house.
4. Abrasives introduced in the cleaning process is a no go for paint. Examples of this is the local carwash, a grubby 4X4 leaves dirt in the brush which introduces abrasives to the next car that uses it. Or your old washcloths that have done years of service may well be due to be replaced. Perth Western Australia is built on a sand plain and those little gritty particles are everywhere, if I accidentally drop the cloth on the ground it is never used again on the car’s paint, I reach for a new cloth.
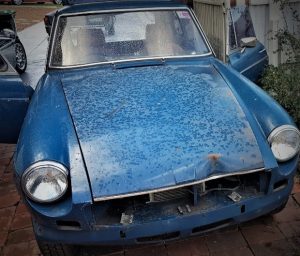
So back to the GT, the paint had suffered the effects of salt crystals eating through the paint, in some spots, it’s reached the metal. And although it’s been garaged for most of the last 17 years the paint was very rough, with little raised lumps like pimples on the surface, which I’m guessing is the salt working its way through, I’m sure if left there for a few years more it could have become a significant problem. Also, there is evidence the Teal Blue GT had a rough life before being taken off the road, there’s lots of red dust through the cracks and cranny’s, stone chips around the wheel arches and sills and numerous scratches as seen on a 4X4 where bushes scraping down the side has left scratches the length of the body.
Refurbish: Well the goal for this project is to refurbish what is there, so, ummm… it was decided to follow a 5 step process using a variable speed orbital polisher.

1. The 1st task was to hit the paint with some 2000 grit paper of the new high tech kind, made in Germany, it was perfect for the job at hand. The raised pimples in the finish and a few larger spots the size of a little fingernail were flattened out which exposed the light undercoat underneath. The 2000 grit took out many of the light scratches but the deeper ones I left there.
2. Next was a high tech 3000 grit with sponge backing. The paint really is quite rough and at this stage, it gave the paint a flat or satin finish look which looks ok and I contemplated sealing it up and leaving it there. It gave the curves and especially the front fender curves sweeping back from the headlights quite a vintage look, it’s interesting how a gloss finish smooths out and modernises these curves.
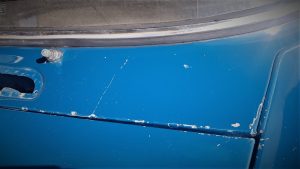
3. Next step was to hit it with some scratch and swirl compound using the foam sponge. At this stage, the paint started to feel flat and smooth and for the 1st time in at least 17 years and perhaps quite a few more the paint had some gloss to it again. Wherever the raised pimples were flattened out, the effect on the darker Teal Blue finish with some gloss on it is like the Milky Way of stars in the night sky. I guess I can always revisit the satin look and cut it all back again with the 3000 grit, it would go some way to disguise how rough the paintwork is.
4. Polish time. The sponge cleaned out and hit with some polishing compound restored the gloss levels again. In the spots where there were not many blemishes, it looks great. If the whole car looked like this that would be nice but that is not the case, there are a lot of blemishes but I really want to retain as much of the original patina as practically possible, who cares if when I pull up at the traffic lights the paint looks like a shiny dog’s breakfast.
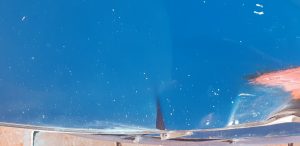
5. Yeah, nearly there, time to seal it up. The paint has some stains as well and seems to stain very easily so it is important to get it sealed up. To save regular waxing to seal it I opted for a longer-lasting ceramic sealer, supposedly it lasts 6-12 months, which is initially more expensive but in the long run, I think it saves both money and time. I must say, I do like the glossy look and the flat smooth feel running a hand over the finish, lovely.
So, other than a bonnet bump and the R/H fender suffering the results of a light nose dive, the plan is to get them sorted at a local body repair shop when the car is rolling again under its own steam, that is pretty much the paint part of the project done. A variable speed orbital polisher was used for the whole process, and a few rags, micro cloths and elbow grease for the tight spots the machine can’t reach. I used two 2000 grit discs and two 3000 grit discs, less than half a bottle of cut and swirl compound, lots less polish, not very much ceramic sealer, the elbow grease, and it took me about 6 days. The option to go down the path of restoring the car with expensive paintwork and a massive amount of time, well I’m happy with the results, I’d rather put the dollars saved into building a car that performs to my specifications, is reliable, and have the car as original as possible running on its own steam a lot sooner.
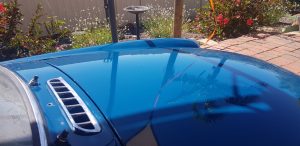
That’s pretty much a wrap on the paint. The precious Teal Blue Gt is looking a little more loved after being neglected for so long.
Happy MG trails…..
by Terry Maynard | Dec 9, 2020 | Brakes, Refurbish, Repair
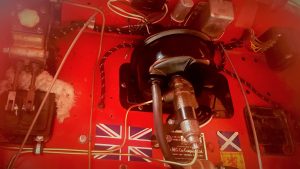
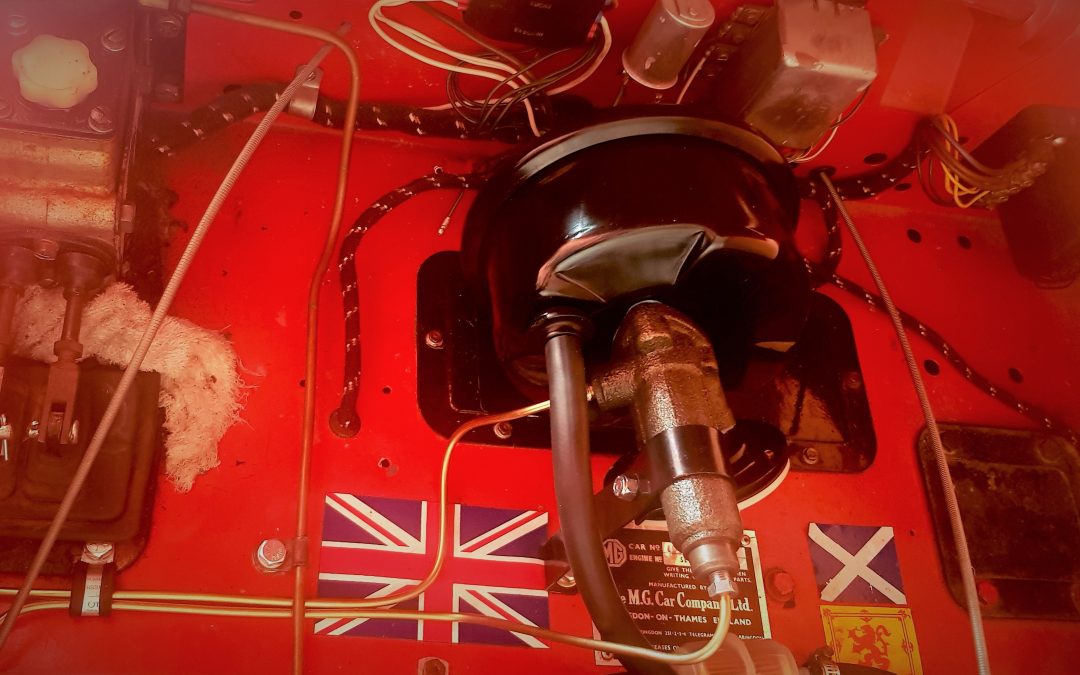
The factory drum brakes on 1500 model cars are a little on the agricultural side. The stopping power of modern cars in traffic and freeway conditions made me quite nervous and got my heart racing. Visions of the precious MGA rear-ending a Hyundai or whatever is not a good scenario to be contemplating in the traffic. The options, upgrade to a disc brake system found on the later 1600 model, and/or install a brake booster system.
With some research and a chat with the MG repairer, the conclusion was that what many drivers are concerned about is often the “feel” of the brake peddle compared to a modern car. The MGA peddles being so close together, for me makes the whole action of operating the peddles slow and awkward which makes getting used to the “feel” of the old school braking system that little bit harder to adjust to. It was decided to start with installing the aftermarket brake booster with the option to go with discs later if needed.
As it turned out, the booster works fantastically. The brake pedal has a feel and touch that is more akin to what we are used to in modern cars, I also found the brakes a lot more responsive, to me, it seems to speed up the response time, important because of the awkward and close proximity of those peddles. The car readily dives in the front end now, it’s easier to apply the brakes firmly which translates into confidence driving in traffic. Gone are the visions of rear-ending a fellow road user with the precious MGA.
The cost in my opinion was very reasonable for the transformation it makes to confidently drive the car in modern traffic. It was a very cheap performance upgrade well worth doing. The MG repairer did a fantastic job of making it a neat and ascetic installation on the plate on the rear shelf in the engine compartment, it can be taken out and returned to factory specs easily and there are no additional and unnecessary holes in the bodywork.
by Terry Maynard | Dec 8, 2020 | Refurbish, Repair

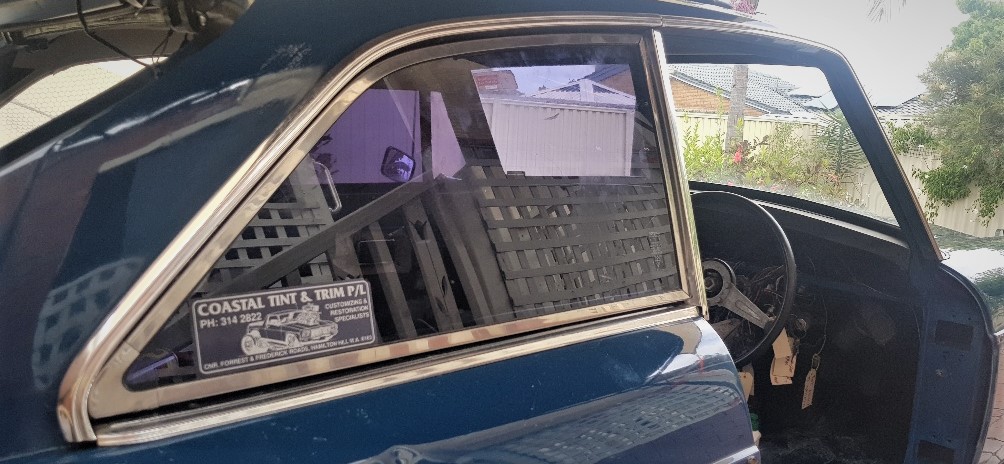
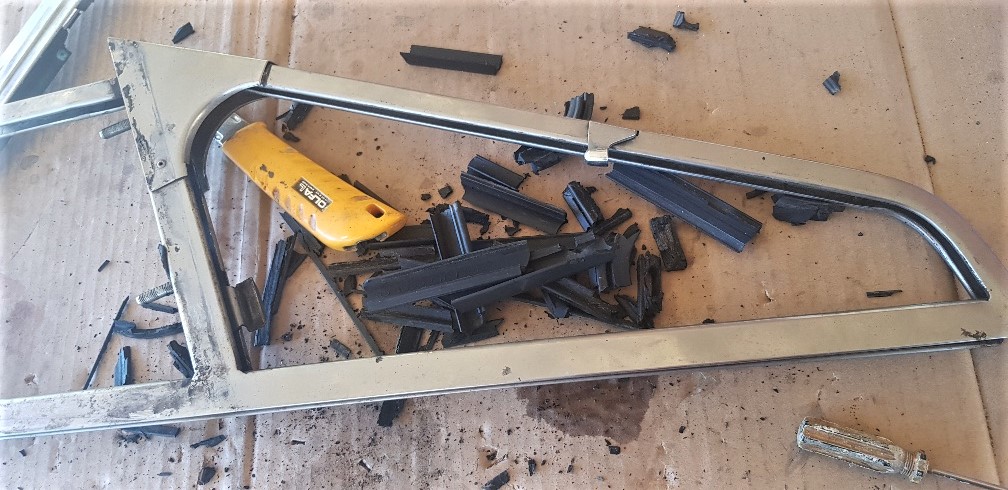
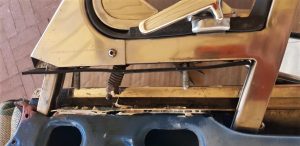
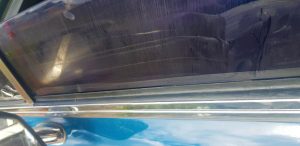
To avoid doing this job at all, an alternative would be to buy an MGA, no window glass and its accompanying seals to deal with, otherwise, read on.
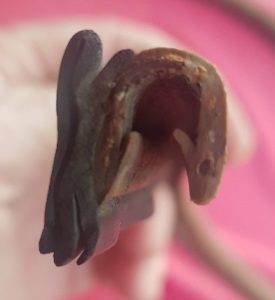
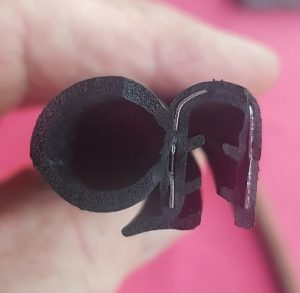
The door and window rubber on the GT was in a sorry state, hard and brittle. Time to be replaced, and If that rubber is shot, then so too will the channel rubber that the door glass slides up and down in. Order it at the same time, or if you don’t for whatever reason, (I thought mine were ok till I got a closer look), I got them from a local supplier, it is a very common type and is called “Bailey Channel”, there are 4 sizes, the MGB is the second smallest. It’s available in Australia from good old Clark Rubber, who stock over 100 different car rubbers and seals, otherwise another rubber and seal supplier, or wait another week for an order to arrive from the UK. And do order the gasket between the frame and trim piece. Also, get some non-curing mastic and new rivets from your hardware.
Here is a link to part 1 and part 2 of an excellent YouTube vid on how this is done, very handy. I followed this procedure with only 1 or 2 minor departures.
Part 1….. https://www.youtube.com/watch?v=KE-kIhL_0v8&t=617s
Part 2….. https://www.youtube.com/watch?v=buAh5rLwh74&t=1104s

Follow the steps in the vids, a departure will likely require going back a step to do it again? It is one of those jobs that is a slow and patient process. After completing one door the next will be a lot easier but it still takes time, for example, the quarter window glass is best held in place with its frame and new rubber with clamps overnight. The driver’s door was off the car so I did that one on the bench, the passenger door was done on the car and I found it much easier as the door was held in situ. I won’t describe the procedure step by step as the YouTube vid does that, but I’ll note key points to take notice of.
I soaked all the nuts and bolts in CRC a couple of days prior to starting the job. The 1st two bolts that come out allow the rear side window glass channel to be taken out. Paying attention to how this comes out will be handy for when it has to go back in, which will take some maneuvering to get it lined up and secured again.
I soaked all the nuts and bolts in CRC a couple of days prior to starting the job. The 1st two bolts that come out allow the rear side window glass channel to be taken out. Paying attention to how this comes out will be handy for when it has to go back in, which will take some maneuvering to get it lined up and secured again.
Take note how the 2 attaching points on the window glass rail slip out of its channel, it will be useful for when it goes back in. Fitting the glass back in the door that was still on the car just fell into place easily and was much easier than the door I did on the bench which required me having to hold the door as well as locate the channel. I didn’t replace the rubber in the window class channel, although it was old and brittle, it was not going to budge and come apart so I decided it was best left there. Grease up both rails on this channel before putting it back in.
In the video, he didn’t take off the top trim piece that holds the window weather seal rubber which is secured to the door by rivets. This is one of my departures as I found it necessary to take this off for two reasons. Firstly the quarter window frame comes out a lot easier together with this piece, and secondly, the frame goes back on a lot easier with this trim piece held together. It’s because of the odd angle of the bolts and spring tensioner, if that trim is on the door the holes don’t line up when you try to marry the frame to it because of the angles, so hold that trim to the frame and marry these two pieces to the door and it will go back in smoothly. The bonus is you get to clean up the trim piece, polish up the duco under it, put a new bead of non-curing mastic between the door and the trim piece, the new gasket between the frame and trim piece and put it back with nice shiny new rivets. Yippie!
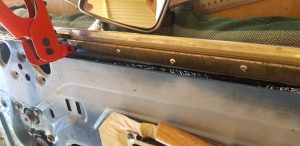
When you put in the new Bailey Channel, notice that the one taken out had a couple of spots of glue. Put a few dots of glue to hold the new Bailey Channel in place. Some months down the track the thought of this sliding down the channel and me having to open it all up again to fix it would not be a good outcome, no sir eeee, gluing it now is a good idea.
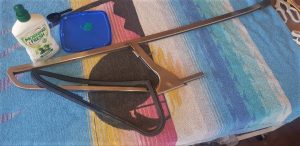
Quarter window rubber weather seal. It’s an ideal time to clean up and polish the frame. When fixing the new rubber, the use of dishwashing detergent readily available from the kitchen acts as a great lubricant to help the new rubber to slide and pop into place, starting at the top of the frame and working your way down. Job done, and it will be gratifying compared to the hard brittle stuff you took out.
Gently pry apart and separate the quarter window glass from it’s 2 sided frame. Putting it back together I found it best to hold the frame in a vice, try to put the new rubber in the channel and hold it in place as best as you can with pegs or small clamps. Doing the second door I discovered it was easier to firstly jam in the little semicircular chrome piece into its corner, holding it in place so it doesn’t slip out, and slowly marry the glass to all this. Be mindful of the length of rubber, keep trying to stretch it out as you go so it won’t come up short, all the time using the dishwashing detergent as a lubricant. The glass will want to keep sliding and popping it’s way back out, keep working it in and down, when it gets closer to where it needs to be, apply some clamps to press it all the way in. Once it is all the way in I found it best to leave it clamped overnight. The next morning the excess rubber can be trimmed with a sharp blade. Tighten the spring bolt that puts tension on the glass within its frame so it will stay open when driving along and not blow shut.
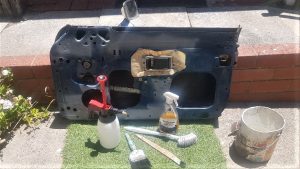
While the door was free of its burdensome parts it is a good opportunity to give it all a thorough clean up inside and out. Some degreaser for greasy parts and orange-based cleaner gets it done. I hit a couple of small surface rust spots with a rust treatment, primed with red oxide, undercoated and touched up the paint with a spray can that was prepared by my local automotive paint store. I took the opportunity to also apply some additional sound deadening, surface cleaned with isopropyl so the self-adhesive strips stick well.
The door glass weatherstrip. A light spray with CRC gives it some slip, gently tap the little spring clips off, I used a jeweller’s screwdriver and a small tack hammer then grabbed with needle-nose pliers.
Put the new weatherstrip on after putting the frame back in but before the glass goes in to trim and align it properly. Putting those little spring clips back on is fiddly, the combination of holding the clip with needle-nose pliers, twisting a flat blade screwdriver to gently get the clip started, and finally, multi-grip pliers to bed it into its right place. Use more dishwashing detergent to lubricate the new weatherstrip so the window glass going up and down as you test it won’t grab.

Putting it all back together I put a dab of copper grease on all the nuts and bolts to make it easier in the event that someone else does this job 40 or 50 years down the track. Ummm, maybe that’s not likely, but who knows.

Take the time to oil up the window winding mechanism, all the joints and grease the cog behind the window winding handle inside. And I hope you ordered the top rubber trim that crowns the window glass and frame in all its glory, now is a good time to fit it. (See top picture.)
Happy door window glass rubber and seal replacements(:

Recent Comments